Monday, January 31, 2011

My expensive hobby!

I am excited to be making two cakes (well actually 3) in the next few months, I am making two smash (small) cakes for my friend's twin girls first birthday, next week (I need to get cooking!) and I am making a wedding cake for a friend in May. I'm very excited!
I purchased some used baking pans from a woman on craigslist for $30, probably would have cost about $100 new, so I am pretty pleased. I purchased some cake boards (the piece of cardboard that the cake sits on) from Fante's, a kitchenwares shop in South Philadelphia that has everything I might want for cake decorating and cooking in general (if I only had a couple hundred dollars to play with).
image 2131086291-0
my craigslist find!
Since I am starting the two little smash cakes this week to be ready for the weekend, I purchased ingredients this weekend: flour, butter, baking powder, eggs, applesauce, cream cheese, powdered sugar, brown sugar and a bunch of other things I needed...Total = $35 

I really hope this turns out great!

Friday, January 28, 2011

Another happy recipient!!

My brother just posted professional pictures of his new family, so adorable! Katherine of Katherine Chambers Photography did such a great job (they made my heart melt), she based out of Cleveland, OH. But I was pleasantly pleased to see that a few pictures included a crochet bear hat I made!!
In all honestly it wasn't hard to make, I didn't have a pattern or anything just winged it after seeing similar hats (made it in a car ride to go see little Hunter last November).
Here's one of my favorite shots:

http://www.katherinechambers.com/

Thursday, January 27, 2011

Koala Onesie

I've been slowing putting together a care package for a special friend who is also having a little girl in April. I wanted to make her something for her new arrival that is somewhat personalized, I know her favorite color is pink and she loves koalas.
I am a bit of a perfectiveness & hadn't had a clear idea of what I wanted the finish product to look like, so this project has been started & restarted several times (the reason why it took months to finish). I tried using several different materials (yarn, tulle, embroidery thread, felt), at one point the onesie was partially knitted, had a pink tutu, and had handmade felt flowers on it. But I needed to "edit" my ideas, so this came up with:

I ended up just using gray & black felt, a little bit of pink fabric and some embroidery thread to finish it up. I like they way it turned out, it is a goofy koala but it's cute.
Here's a close up:

Friday, January 21, 2011

Tree Hugger onesie!

I had an idea to make a coworker a gift for his impending little girl, well she came here about month early, so I was in a rush to finish it quickly before it was too late. My coworker is the biggest tree hugger (self-proclaimed) I know, I mean the man is a vegetarian & eats from fabric sandwich bags (which I think is awesome). Since I always try to make my gifts a little more personalized, I wanted to incorporate his love for mother earth.
Since I have plain white onesies leftover from my 3-pack of Carter long sleeve onesies purchased at target for my last project.
I was inspired by this picture of a barrette I came across when I Googled "tree hugger":

So I went to the craft store and purchased and also rummaged around the house for thing I had:
1- sheet of brown felt
1- sheet of dark green felt
Green fabric paint (something that will contrast against the green felt)
Brown fabric paint
Green embroidery floss/thread (something that will contrast against the green felt)
Brown embroidery floss/thread
Lightweight Fusible Interfacing (to protect baby's sensitive skin)
Freezer Paper (my new favorite media, it's paper on one side & wax on the other, it can be ironed to create screen printing templates among other things, the only place other than the internet that I can find it where I live is at the supermarket where the aluminum foil & sandwich bags are)

First I organically cut a tree out of the felt, perhaps if I do this again I'll make templates & take more picture (sorry).
Next I went on the computer and messed around on word processing program (i.e. Word) to figure out what style font I liked.  If you have a ink-jet printer you can print out the text/design straight on to the paper-side of the freezer paper but if you have a laser printer like me, you'll gonna need to print out on regular paper (since the heat from the laser printer would clog up your rollers and create a gummy mess) and then trace it on to the freezer paper.
I then used "Exacto" knife (razor blade) to cut out the letters out of the freezer paper, I can't rationalize buying one of those Cricut (personal cutting machine) yet... maybe if I start a business or something.
I then dabbed on the paint on to the felt waited for it to dry (about 2-3 hours), then peeled off the freezer paper.
But I felt it still needed definition, so I used the green embroidery thread to spruce it up the lettering and attach it on the onesie. I gave it some more personalization, using the freezer paper & brown again to include the mom's, dad's & baby's first initial in the heart.
I really love the way it turned out!!

Monday, January 10, 2011

Homemade Wonton Soup


It snowed Saturday, which made me think it would be perfect soup making weather.
My favorite soup to make lately is Wonton Soup....it's better than anything you'll get at any Chinese food delivery, or at least I think so.  This soup will take a couple of hours to make but there will be plenty of left-overs, probably making enough for 7-8 people or freezes up nicely for future meals. Since I know some people may have some problem getting some of the ingredients, I provided some alternatives.


Ingredients:
3 bunches green onions/scallions
4-inch piece of ginger root
8 cloves of garlic
1 medium yellow onion
1/2 tbl Shao Xing (Chinese) Cooking Wine or dry sherry cooking wine
2 tbl Chicken Base + 6 qts water OR 48 oz Chicken Broth + 4 qts water
2 lbs ground pork
1/2 lb boneless pork chop
1 bunch of chives or 1 cup if sliced napa cabbage
1 lb of box choy or napa cabbage (optional)
One egg
1 teasp Sesame oil
1 tbl oyster sauce
1/2 teas of  cracked black pepper
large pinch of kosher salt
One package of wonton wrapper

I do all my chopping first, placing them into small bowls, you will need to:
- mince 4 cloves garlic (wonton filling), leaving 4 peeled whole cloves (broth)
- rather than peeling ginger I cut off sides of ginger using them for the broth, leaving a skinless rectangular piece of ginger from the center of the root, I mince this piece of ginger making ~approximately 1/4 cup minced ginger for the filling
Ginger scraps for broth
- Cut one bunch of green onion into 3-inch sections, with the other two bunches, cut off ends from green onion (saving them for broth), thinly slice green onion forming ~approximately 1 cup of little green rings
Minced garlic/ginger & Green onion sections
- Peel skin off of yellow onion, slice in half

Cut up pork chops into thin strips, approximately 1/8" wide, 2" long, leaving fat trimming to side momentarily.
Place the fat trimming in your stockpan on medium heat, cook fat down slightly this will add a little flavor to pan and create a little grease, then add pork strips, toss slightly for about 2-3 minutes (pork should not be cooked completely), remove pork strips, put aside.
Par-Cooked pork strips
Begin broth by adding chicken broth & water (well I use chicken base, since it's easier to have on hand than gallons of chicken broth) in the stockpot you used to cook the pork strips without washing the pot (those tasty pork bits cook to the bottom of the pan will make for a delicious soup.
Chicken base
 The broth should taste like a diluted (weak) chicken broth. Add in the whole garlic cloves, yellow onion, ginger scraps & the green onion. Bring broth to boil. Add in Chinese cooking wine. Now lower broth to a simmer for about 1-1.5 hrs, stirring occasionally. Season with black pepper & salt to taste.

While broth is cooking, prepare Wonton filling by combining ground pork (which can be purchased by asking the butcher at a grocery store to grind a piece of pork shoulder), egg, Sesame oil, osyter sauce, black pepper, salt, and chives or napa cabbage (or both).
I like to use my hands to mix the filling even though a spoon would probably be sufficient.
Now prepare your workstation for folding your dumplings:
You will need a large plate to for finished dumplings, a cup of warm water, and a working surface like a cutting board.
Now take a wonton wrapper (can be purchase at most grocery stores in the produce section) and place about half a tablespoon of filling in the center of the wrapper.
Wonton Step 1
Use warm water to moisten all four sides of the wrapper, fold wrapper in half forming a triangle, be sure to remove any air within the wrapper & filling.
samosa wonton twist
Wonton Step 2
Source
Moisten the two long corner of the triangle with the warm warm, now pull the two corners together, pressing them to seal them. (it helps to push the center slightly to get the two corners together)
samosa wonton twist
Wonton Step 3
Source
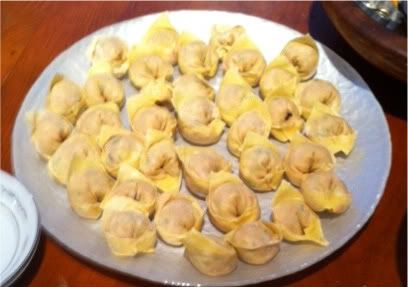
Before long, you'll have several dumpling ready to cook!

Once you have started to make two or three dumpling, you can start cooking them. To cook them, in a large saucepan, bring ~about 4 cups of water to a boil, place about 6-8 dumpling for 8 minutes, (during this time I continue to fold more dumplings, remove all the broth vegetables from the broth & put pork slices into the broth), when the dumplings are finished they will float, place them into broth, continue to cook & fold all the dumplings until you run out of either Wonton wrapper or filling.

Boiling Wonton Dumplings
About 5 minutes before serving the soup, I like to add in additional vegetables (boy choy or napa cabbage) using heat to slightly wilt them. 
Serve 5-6 dumplings with each bowl & garnish with the sliced green onions.
Hmmm....dumplings